![]()
![]()
![]()
![]()
![]()
![]()
![]()
![]()
![]()
![]()
![]()
![]()
![]()
![]()
![]()
![]()
Film Restoration & Preservation Film preservation, is an ongoing project among film historians, archivists, museums and many non-profit organizations to rescue decaying film stock and preserve the images which they contain. In the widest sense, preservation nowadays assures that a movie will continue to exist as close to its original form as possible for future generations. A huge percentage of films from the silent period are already lost, it is believed to be upwards of 90% and around 50% before the 1950s. For many years the term “preservation” used to be a synonym of “duplication” only. The preservationist’s goal was to create a durable copy without significant loss of quality. Film preservation now holds the concepts of handling, duplication, storage, and access. The archivist seeks to protect the film and share the content with the public. Film preservation should be distinguished from film revisionism, in which long-completed films are subjected to outtakes never previously seen being inserted, new music scores and/or sound effects being added, black-and-white film being colorized or converted to Dolby stereo, or minor edits or other cosmetic changes being made. However one has to recognise that every so often original material appears in some long forgotten dank basement, which adds precious frames or lost/deleted scenes.
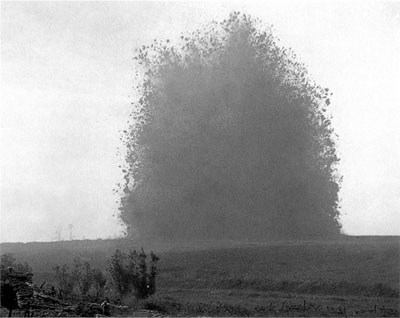
I have worked on the restoration of many films which have either had scenes replaced with better duplicates, or more intricate material which was removed for public exhibition, such as an Italian film called Riso Amaro (Bitter Rice). After raiding the archives at Cinecitt à Studios we managed to reinsert an abortion sequence that had been removed. When restoring Battle of the Somme, the archivist I was working with brought in a reel he had been given, recognising it as a much longer explosion than the existing version in the edit they held and I was restoring. (Right: Hawthorn Ridge Explosion)
Film Restoration Issues
Modern, digital film restoration follows the following steps:
Roll over the following images to see the digitally remastered versions L'avventura (1960) - Scratch Removal, Clean & Grade This still was taken from a section of roughly eight minutes, where our digital lab was pitted against a traditional optical lab for restoration. We were challenged to compare how well a digital route would work. What it demonstrated was that our final restoration was far steadier and much cleaner, compared to their optical versions, which had been under restoration for many laborious months. They deemed the optical route far too time consuming, however they did not have enough budget to re work the material already restored. Instead we were commissioned to only fix the real problem areas from the negative. We worked extremely hard with the optical lab to output our versions to cut in with the new optical sections, so the material matched the density before and after.
Charlie Chaplin - Print Restoration The following images were taken from a Charlie Chaplin restoration test. The sequence was scanned from a print, which had gone through multiple generations of duplication, not a single original negative remains. As far as I am aware this process had never been tried before I attempted this?
Side by Side Comparison - The sequences below are by no means finished, they were a quick test to show what we were capable of with only a print. Imagine what we could do with an original negative? The image to the left in the split is after restoration, the image on the right is before restoration. The frames have been split to see the difference. The sequence on the left has been restored with the following steps by removing the jitter and weave from the image, stabilising and reframing it. Then equalising the flicker across the sequence, which is maybe to subtle to see on my converted flash video. Removal of the tear across the top of the image which has been gradually erased by using clean(er) frames either side. Finally the sequence had the damage down the left hand edge gradually painted away. This sequence would have taken many passes backwards and forwards cleaning a tiny section at a time. The sequence on the right was graded to stretch the blacks and whites, a technical grade. (On the transfer to flash, the whites are a little blown.) Please take note of the last few frames, in the original as we come to the edit point, the grade fades away to nothing, I was able to step grade a frame at a time to bring back the detail.
Before & After Restoration - The interesting thing for restoring old material, in my opinion, is how far do you ultimately go? The purists would say it is sacrilege to restore the material in the first place but we owe it to future generations to do so. In my opinion if there is detail in the negative/dupe or as in this case print, it is our duty to reveal it to a fresh new audience. I restored Battle of the Somme and many sequences revealed much more detail than had been seen before, the historians were able to recognise villages that the soldiers marched through and see landmarks that had been lost with the many duplication processes. Digital restoration is an amazing tool but I also have to suggest that many eyes are needed to grade everything but revealing otherwise hidden areas are what I feel is the whole point. Not just removing scratches, dirt, jitter, weave and other damage.
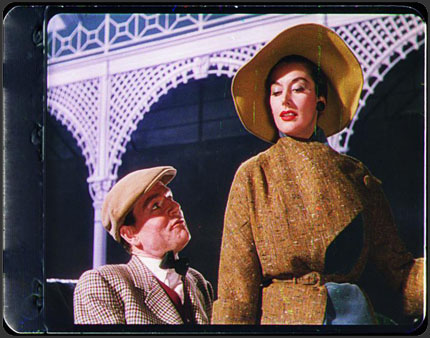
Genevieve 3 Strip Scratch When Technicolor material is re-registered and aligned because the three strips suffer different damage independently sometimes you can use one emulsion layer to mend the problematic area. Alternatively using a combination of frames forward and backwards can be used to fix scratches or other anomalies. For a greater in depth look at Genevieve material please see the section technicolor 3 strip.
|
|---|