GRADING TERMINOLOGY
Lift: This adjusts the images black level (dark tones or shadows), it locks the RGB component together and effectively gangs them together only working in the black areas of the image.
Individual RGB Lift: The black levels can also be separated and used per colour, so if you wanted to cool off the shadow detail you can individually work on 'Blue Lift' independently.
Gamma: Works the image levels between the shadows and the highlights, commonly known as the mid tones. The mid tones. become brighter or darker, the whites and blacks stay the same
Individual RGB Gamma: The same as RGB Lift but only working on the mid tones.
Gain: Only adjusts the white level (highlights), actively ganging the RGB components together and effecting the highlight areas of the image. Brighter colors become darker or brighter - the brighter the color the stronger the difference, blacks will stay the same.
Individual RGB Gain: Independent control of highlights, so if you have introduced a colour in the whites you can singularly remove or introduce a colour.
The terms Lift, Gamma & Gain are commonly used by most color correction systems, but those definitions may vary from system to system and manufacturer to manufacturer.
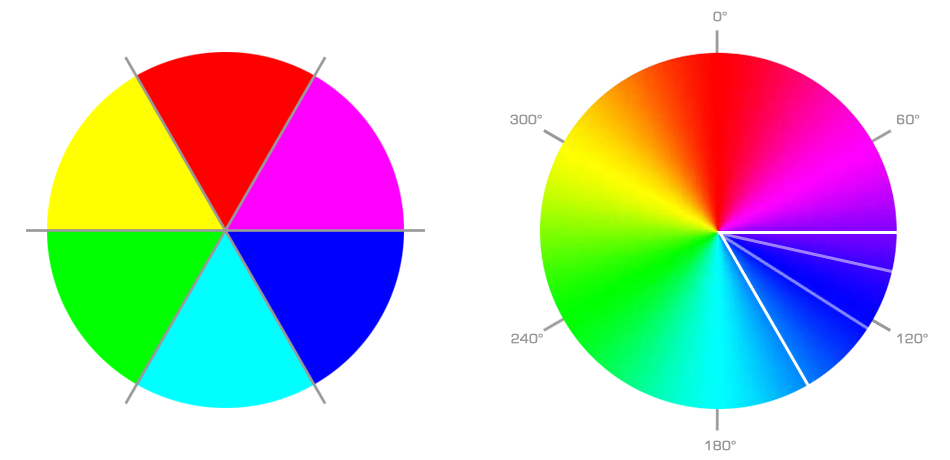
Hue: This refers to the particular colour that is being selected and essentially is the range of colour's available, An individual selection can be rotated by 360 degrees effectively moving it through every other hue.
Saturation: This refers to the level of colour saturation within the image or the amount of chrominance information.
Primary: In the colourist terminology, "primary" corrections are those that affect the overall color balance of an image. Since film has different gamma characteristics for shadow, mid tone and highlight detail, color correctors usually have separate balance and level controls for each.
Secondary: Traditionally secondary corrections are those that only affect a specific color within an image, secondary isolation can be defined by hue, saturation, and luminance. In effect the correction is forming an isolation matt to just work on the individual colour in question. In older toolset's, usually this is hidden as the operator need not see what is happening in the back ground, however it is useful to see this as it can sometimes inadvertently effect other colour's that you may not notice on that scene, but will effect the scene-to-scene correction.
Windows: A window defines an area of the image for extra or different color enhancements. A graduated filter effect would be applied in this way. The colorist can use a combination of windows and secondaries to qualify enhancements, and so "windowing" is sometimes used to include secondaries. Windows are intrinsically predefined shapes, such as a square, circle or oval, they allow for corrections to be made inside or outside and softening can graduate the grade so it feathers the edge. Also multiples can be applied to dissect each other to make a myriad of complicated shapes.
Shapes: Older colour correctors only allowed preset windows or shapes because they had no interface to draw complex shapes. Those that have developed from effects toolset's, or been developed by those who have traditionally created effects tools have taken shapes to a higher level. Custom shapes can be hand drawn and dynamically keyframed or tracked across the scene. Softness can be controlled across the entire shape, or between single points allowing variable softness. This technique has allowed the colourist's repertoire to become even more creative, allowing the creative to start creating complex lighting conditions within a scene that can bring a greater mood and depth.
Vectors: The simplest devices offer six fixed vector colours. Usually the colourist can isolate a single colour within a scene without having to specifically pick an area. For example with the full blue vector open it selects 60° of the blue vector, if the colour is slightly less it can be tweaked for control.
Custom Curves: The simplest way to look at a custom curve is being able to bend the colour from a certain point without effecting the colour/luminance below or above that point. There may be certain areas that just ned to be lowered slightly but if you lower everything the colour in the area you need to keep the same will also be effected. Therefore you can use a curve to protect that area without changing the rest. Some colourist's will refer to this as fettling, in fact this was derived from a colour correction technique developed by Quantel called Fettle, it proved rather popular with effects artists and colourist's alike.
Dynamics: When the scene initiates a change in action or lighting conditions, the colourist needs to also execute/emulate a colour change as well to either accentuate the change or keep the levels similar - or ultimately change the lighting conditions entirely too accent the scene. For example in a scene where a light is switched on, flooding the room in light, if the grade stayed consistent, the shot may be blown out or you may want to accent the scene by introducing a different colour by the new lighting conditions. Instead of a flat grade throughout the scene, a keyframed adjustment is needed and employed. It is therefore possible to create gradual changes which are commonly known as Dissolves or Dynamics.
Mask/Matte/Key: This is basically a viewing area defining the areas that are being colour corrected - usually a black and white mask, sometimes they can be a red overlay, the areas that are white or opaque allow for corrections to be applied.
Transfer Terminology
Film Analysis (Dailies) or Onelight: This is made to assess and check the quality or exposure of a negative from the days shooting schedule. Ultimately this is a check to make sure the production have captured the necessary views and scenes within a shot. Also to make sure that there are no unforeseen problems in the scene, it would be very expensive to set up the same shots later in the production, especially if they have moved the production elsewhere. Many cinematographers request a "One Light" transfer. No scene-to-scene changes are made to the grade; the one light is established by calibrating minimum (black) and maximum (white) densities of the negative. For best results, this setup should be done with the aid of test charts that should be shot at the beginning of the film so the colourist can simply grade to the chart (Grayscale) for the negative or at the beginning of each scene if being captured on tape. This will be transferred traditionally to Standard Definition for review but some dailies are now beginning to use High Definition transfers.
The test charts are shot specifically to set-up the one-light grade, this makes this type of evaluation more effective. Suitable charts vary from a simple Kodak card with black, 18% gray and white strips, or GretagMacbeth color patches, to more engineered products such as those supplied by Gamma & Density. Other than the rush print, the one light is the only way of checking exposure which has remained the method of choice.
Offline Transfer: If the material is going to be edited offline, it must be transferred to video before being digitized. In this scenario the final edit could be film or video. If it is for a final video production it is normal to retransfer the selected takes after editing and spend more time on the chosen frames.
Best Light Transfer (Technical): In many cases a best light transfer is used instead of the previous two methods. In this case each scene is optimized from the film and then graded. A technical best light is graded to look the way it was shot, and is a perfect base for tape-to-tape grading after the edit. However, since the offline copy is often presented to the client for approval. If the transfer is good enough a final grade is not always undertaken, budgetary constraints can justify this workflow.
In a technical light the material is carefully balanced with blacks lifted approx 5% and whites approx 5% below clipping (where they blow out). This grade avoids clipping out any import any negative detail, and provides a very good base for tape or disk grading later on. It can be pretty quick; a colourist will often search through multiple takes at high speed, checking and grading each new scene as necessary. Then rewinding and recording the material back to tape for review by the client. No decision on the final look is made and it is common to only use the basic setup controls lift, gamma & gain.
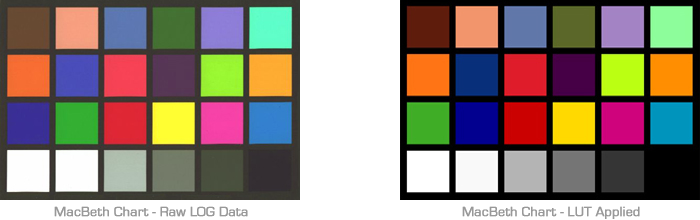
Data Dailies: This has arisen recently from within the Digital Intermediate workflow. With the advent of faster scanners that can scan SD in real time, this takes the subjective grade away from the telecine operator for the initial check of the dailies. The scanner scans a full representation of the captured image as LOG but in a smaller resolution (SD or HD) and applies a generic LUT for the required output, such as SD or HD. This is a far more technical approach which gives a far greater accuracy/representation of the captured cinematography. This can significantly reduce the shock factor when the DOP or Director view their final scans projected in the DI environment for the first time at cinema quality.
This workflow is still very new and not adopted very often but I'd personally recommend it if following a Digital Lab workflow as it can stop unforeseen problems when viewing the material for the first time.
I remember working with a Director who had an absolute fit when he saw his 'untouched' raw scans, as he ordered. They were varying shades of blue and yellow. After calming down and realising the grade would 'normalise' the image, putting his dummy back in the pram, he relaxed and then informed me, and in fact prided himself that he did not use a single filter to shoot the entire film. Later in that same show he then proceeded to have a second fit as his images were 'out of focus!' Telecine operators can introduce sharpening tools, thus making focus problems seemingly disappear, however the scan will focus on the grain and will show any focal problems, as you are not correcting them from the source. The director was not expecting this problem as his 'dailies' had not for seen the problem. Is it his fault he did not understand, or should we educate what can go wrong? I am always amazed at the lack of understanding by the DOP or Director to understand these problems because they shot the material, the colourist who bares the unfortunate news, did not!?
D Min/ D Max: The selected takes are scanned via a film transfer engine, such as the Spirit Datacine 2K/4K, Cintel or Millennium [10bit log Cineon density mapped DPX format], from the original negative, complete with matching timecode information in the header for conforming. Often used to try and catch the greatest dynamic range on the negative without compromising the blacks or whites, to give the greatest dynamic range - this is a telecine workflow for Data Dailies.
Selects Transfer: There are many changes that can be made to an image to improve its look or effectiveness, but they take time to set up. It is expensive to transfer every take and grade each individual scene independently, so a selects reel is made and only the individual selected shots are transferred. Usually on film, it would be from flash to flash, or if tape, from the clapper to the end of the scene.
Final Grade: The transfer of the selects might be the final grade and is sometimes referred to as such. However, in Long Format (feature length motion pictures) it is the edit master that is graded, with every attention to detail. This is when every frame is scanned and conformed, optical's and FX added to finalise the edit. For a feature film the source will usually originate from film but with the advent of digital cameras, many are captured on tape or direct to disk.
Long Format work includes not only feature film but also duplication mastering, film archival, and restoration. These markets demand the highest quality images possible regardless of cost and time. Archive transfers and film finish projects are done as data. D-Cinema and final mastering is done from the 2K or 4K Master Timeline using LUTS (look up tables) to work all, or most of the deliverables. Depending on the contract, the deliverables could be a single format such as the negative but more often include 3 to 6 different formats.